0. 프로젝트 목표
- docker를 이용해서 컨테이너 생성하기
- dockerfile을 이용해서 웹서비스 구축하기
1. 키워드
Docker
- 리눅스의 응용 프로그램들을 소프트웨어 컨테이너안에 배치시키는 일을 자동화
- 리눅스에서 운영 체제 수준 가상화의 추상화 및 자동화 계층을 추가적으로 제공 (ex. vm, vbox)
- Docker container는 일종의 소프트웨어를 실행에 필요한 모든 것을 포함하는 파일 시스템 안에 감쌈
- 독립적인 컨테이너가 하나의 리눅스 인스턴스(프로세스) 안에서 실행할 수 있게 함으로 가상 머신의 부담을 줄임
Wordpress
- 템플릿 시스템을 사용해서 PHP와 HTML 코드 수정없이 페이지를 편집하게 해줌
- 최고 수준의 CMS (Content Management System)
phpMyAdmin
- MySQL을 www에서 관리할 목적으로 php로 작성한 오픈소스 도구
- 데이터베이스, 테이블, 필드 등의 작성 수정 삭제 가능
- 웹 호스팅 서비스를 위한 가장 대중적인 MySQL 관리 도구
MySQL
- 가장 많이 쓰이는 오픈소스의 관계형 데이터베이스 관리 시스템 (RDBMS)
- 오라클이 관리 및 지원
Nginx
- 웹 서버 소프트웨어
- 가벼움, 높은 성능
- 아파치와 엔진엑스가 주를 이룸
debian buster
- debian 10의 이름, 릴리스 이름인듯
- linux os
SSL -> redirection (Secure Sockets Layer)
- 컴퓨터 네트워크에 통신 보안을 제공하기 위해 설계된 암호 규약
- https가 사용될 때 웹 브라우저가 SSL로 암호화된 페이지를 요청하게 됨
- 무결성 보장 -> 서버와 클라이언트의 인증하는데 사용
- 80 -> 443
autoindex
- Nginx 지정 디렉토리내에 있는 파일들 자동으로 list화
- Nginx에서 지정할 수 있는 듯
2. 서브젝트 큰그림
1) Docker로 debian을 기반으로 OS 컨테이너 생성
2) debian에 nginx올림
3) Nginx 웹서버가 사용할 Mysql올림
4) MySQL을 wordpress와 phpmyadmin로 씀
| 서브젝트 큰 그림 | |
| WordPress, phpMyAdmin | |
| MySQL | |
| Nginx | |
| DOCKER | |
| Host OS |
5) dockerfile을 이용해서 위의 과정을 자동화
3. Docker
- 기존의 리눅스 컨테이너 방식(cgroups)을 잘 포장한 프로젝트
- 의존성 및 파일 시스템까지 패키징하여 빌드, 배포, 실행
- 다른 운영체제에서 HelloWorld를 찍어내는데 고작 3초
- 모놀리식 -> 의존성이 적은 마이크로서비스 아키텍처를 사용 하기 위해 많은 기업이 컨테이너 사용
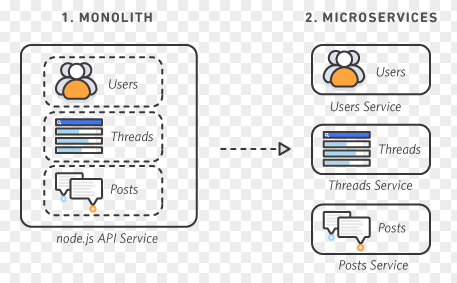
- 기존의 호스트를 부하시키는 virtual machine과는 다르게 리소스를 덜 잡아먹음

- 이미지와 컨테이너 방식을 사용
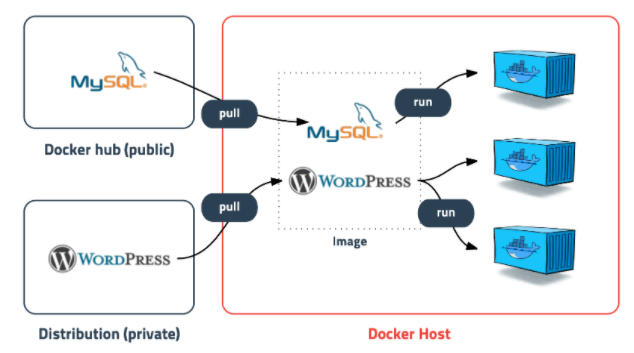
- 이미지 : 컨테이너 실행에 필요한 파일과 설정값등을 포함하고 있는 상태
- 컨테이너 : 이미지를 실행한 상태
cf) image: container = class : instance
- 자세한 내용 참고
subicura.com/2017/01/19/docker-guide-for-beginners-1.html
초보를 위한 도커 안내서 - 도커란 무엇인가?
도커를 처음 접하는 시스템 관리자나 서버 개발자를 대상으로 도커 전반에 대해 얕고 넓은 지식을 담고 있습니다. 도커가 등장한 배경과 도커의 역사, 그리고 도커의 핵심 개념인 컨테이너와 이
subicura.com
blog.naver.com/isc0304/221840483579
1 도커와 컨테이너 소개
1.1 왜 필요한지 알고 계신가요!!- https://www.youtube.com/watch?v=ePpiEy_C_jk- https://www...
blog.naver.com
====================================================================================================
4. 서브젝트 진행
1) docker로 debian-buster 실행하기 (기본)
- 기본적인 명령어
docker run [option] IMAGE[:TAG|@DIGEST] [COMMAND] [ARGS...] : 컨테이너 실행

docker ps [option] : 컨테이너 목록 확인
docker stop [option] CONTAINER [CONTAINER...] : 컨테이너 중지하기
docker rm [option] CONTAINER [CONTAINER] : 컨테이너 제거하기
docker pull [option] IMAGE[:TAG|@DIGEST] : 이미지 다운로드
docker images [options] [REPOSITORY] : 이미지 목록확인
docker rmi [option] IMAGE... : 이미지 삭제
docker logs [options] CONTAINER : 컨테이너 로그
docker exec [option] CONTAINER COMMAND : 컨테이너 명령어 실행
- docker 위에 debian buster를 올려야 하므로 docker run으로 실행해봄

- exit로 종료 후 docker ps -a 으로 종료된 컨테이너도 확인 가능

- docker rm 로 컨테이너 삭제

2) docker에 nginx 올리고 실행해보기
- nginx 이미지가 따로 있겠지만 debian:buster가 가상os이어야 하므로 debian이미지 위에 nginx올리려고 함
- docker run -it -p80:80 -p443:443 debian:buster /bin/bash

- apt update

- apt install -y nginx

- 바로 실행되지 않기에 웹서버를 활성화 시킴

- nginx 혹은 service nginx start

-> 그럼 로컬에서 127.0.0.1:80으로 확인 가능함
- 아직 port 443에 대해서 작동하지 않음 -> 인증서 필요
- 정리 (*도커파일을 위함)
|
1
2
3
4
|
docker run -it -p80:80 -p443:443 debian:buster /bin/bash
apt update
apt install -y nginx
service nginx start
|
cs |
3) nginx에 php 설치 후 설정
- apt install -y php-fpm : PHP FastCGI Process Manager 설치
CGI : 동적인 페이지를 만들기 위해 사용, 웹서버에서 요청을 받아 외부프로그램이 파일을 읽어 적절한 html로 반환하는 것
FastCGI : 기존의 CGI보다 빠름, CGI는 요청이 들어올 때마다 프로세스를 생성하나 FastCGI는 프로세스를 재활용

- vim /etc/nginx/sites-available/default 수정 (안해도 되더라..)
cf) apt install -y vim : 편집기 설치


cf) 44번 줄에 index.php를 자동으로 찾아줌, 물론 nginx의 기본 파일인 index.nginx-debian.html이 있어서 수정을 안해도 상관 없음
-> index.php를 index.nginx-debian.html보다 앞에두면 index.php를 먼저 찾음
cf) 56번 줄 이하는 CGI와 관련된 설정인듯, 주석을 봐도 php스크립트를 FastCGIserver로 전달하는 거라고 나와 있음
- php를 테스트할 index.php 만들기
-> vim /var/www/html/index.php

- service nginx start
- service php7.3-fpm start

- localhost/index.php로 확인하기

- phpMyAdmin에 대한 설정이 아님에 명심
- 정리 (*도커파일을 위함)
|
1
2
3
4
5
6
|
apt install -y php-fpm // 여기까지 함
vim /etc/nginx/sites-available/default (수정안해도 됨)
vim /var/www/html/index.php 만듦
-> service nginx start
-> service php7.3fpm start
localhost/index.php 확인
|
cs |
4) mySQL설치
apt install -y mariadb-server
service mysql start
mysql_secure_installation : mariaDB의 초기설정, (secure login을 위한 root 암호설정)


- DB설정은 여기서 하지 않음
- 정리 (*도커파일을 위함)
|
1
2
3
|
apt install -y mariadb-server
service mysql start
mysql_secure_installation : mariaDB의 초기설정, (secure login을 위한 root 암호설정)
|
cs |
5) phpMyAdmin 올리기
참고한 곳) www.itzgeek.com/how-tos/linux/debian/how-to-install-phpmyadmin-with-nginx-on-debian-10.html
How To Install phpMyAdmin with Nginx on Debian 10
phpMyAdmin is a free and open-source, web-based tool for managing the MySQL and MariaDB servers. It is widely used to manage
www.itzgeek.com
cf) 먼저 추가할 것
- /etc/php/7.3/fpm/pool.d/www.conf에 listen:127.0.0.1:9000 설정
-> 소켓 연결이 아닌 TCP 연결하기 위함
- apt install php-cli php-mysql 설치
-> php-cli는 cli방식
-> php-mysql은 mysql과 연결을 위함
-> 모두 /var/www/html/phpMyAdmin에 있는 php를 해석하기 위함이 아닐까 라고 생각
- 정리 (*도커파일을 위함)
|
1
2
3
4
5
6
7
8
9
10
11
12
13
14
15
16
17
18
19
20
21
22
23
24
25
26
27
28
29
30
31
32
33
34
35
36
37
38
39
40
41
42
43
44
45
46
47
48
49
50
51
52
53
54
55
56
57
58
59
60
61
62
63
64
65
66
67
|
/etc/php/7.3/fpm/pool.d/www.conf에 listen:127.0.0.1:9000 설정
apt install php-cli php-mysql
apt install -y php-json php-mbstring
-> phpMyAdmin과 Mysql연결을 위한 php 확장
wget https://files.phpmyadmin.net/phpMyAdmin/4.9.0.1/phpMyAdmin-4.9.0.1-all-languages.tar.gz
-> phpMyAdmin설치 (wget으로 웹상의 파일을 받음)
tar -zxvf phpMyAdmin-4.9.0.1-all-languages.tar.gz
-> 압축 해제
mv phpMyAdmin-4.9.0.1-all-languages /var/www/html/phpMyAdmin
-> phpMyAdmin이라는 디렉터리로 이동
cp -pr /var/www/html/phpMyAdmin/config.sample.inc.php /var/www/html/phpMyAdmin/config.inc.php
-> 그 중에 세팅에 관련된 config파일을 정확한 이름으로 수정 후 내용변경
vim /var/www/html/phpMyAdmin/config.inc.php
-> blowfish_secret설정 ex) WIh-90275CmlUF-7fsRWfZ9hv.8NYfO[
-> localhost로 바꾸고 주석 제거
mysql < /var/www/html/phpMyAdmin/sql/create_tables.sql -u root -p
-> phpMyAdmin에 들어있는 테이블을 만드는 sql파일을 리디렉션으로 넣음
mysql -u root -p
-> phpMyAdmin db를 위한 권한 설정
-> GRANT ALL PRIVILEGES ON phpmyadmin.* TO 'pma'@'localhost' IDENTIFIED BY 'pmapass';
-> FLUSH PRIVILEGES;
vim /etc/nginx/conf.d/phpMyAdmin.conf 추가 (파일 명은 상관 없는 듯)
-> 서버이름 설정, 파일 찾는 곳(root directory) 설정
-> nginx에 대한 기본적인 설정인듯 -> nginx에 대한 설정은 sites-available <-> sites-enabled에 하거나, conf.d에 기본설정하는 파일을 올려도 됨 server {
listen 80;
server_name localhost;
root /var/www/html;
location / {
index index.php;
}
## Images and static content is treated different
location ~* ^.+.(jpg|jpeg|gif|css|png|js|ico|xml)$ {
access_log off;
expires 30d;
}
location ~ /\.ht {
deny all;
}
location ~ /(libraries|setup/frames|setup/libs) {
deny all;
return 404;
}
location ~ \.php$ {
include /etc/nginx/fastcgi_params;
fastcgi_pass 127.0.0.1:9000;
fastcgi_index index.php;
fastcgi_param SCRIPT_FILENAME /var/www/html$fastcgi_script_name;
}
}
mkdir /var/www/html/phpMyAdmin/tmp
chmod 777 /var/www/html/phpMyAdmin/tmp
chown -R www-data:www-data /var/www/html/phpMyAdmin
-> phpMyAdmin을 위한 권한 설정
mysql -u root -p 로그인
-> 테스트를 위한, 로그인 유저만들기
-> GRANT ALL PRIVILEGES ON mysql.* TO 'root'@'localhost' IDENTIFIED BY '123';
-> FLUSH PRIVILEGES;
|
cs |
- 위의 과정을 다 하면
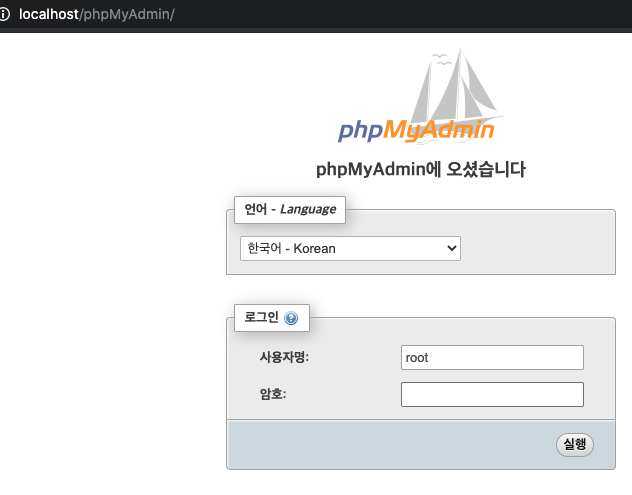
- 웹에서 DB를 GUI로 관리할 수 있는 phpMyAdmin 페이지 등장!
6. wordpress 올리기
How to Install WordPress with Nginx on Debian 10 - RoseHosting
In this tutorial, we will explain how to install WordPress with Nginx on a Debian 10 VPS. WordPress is one ... Read moreHow to Install WordPress with Nginx on Debian 10
www.rosehosting.com
- 정리 (*도커파일을 위함)
|
1
2
3
4
5
6
7
8
9
10
11
12
13
14
15
16
17
18
19
20
21
22
23
24
25
26
27
28
29
|
-> mysql에서 wordpress 데이터베이스 만들고 거기에 유저와 권한 설정
mysql -u root -p
CREATE DATABASE wpdb;
CREATE USER 'wpuser'@'localhost' identified by 'dbpassword';
GRANT ALL PRIVILEGES ON wpdb.* TO 'wpuser'@'localhost';
FLUSH PRIVILEGES;
EXIT;
-> wordpress 압축풀기
cd /var/www/html/
wget https://wordpress.org/latest.tar.gz
tar -xvzf latest.tar.gz
cd wordpress
cp wp-config-sample.php wp-config.php
-> 설정
vim wp-config.php
// ** MySQL settings - You can get this info from your web host ** //
/** The name of the database for WordPress */
define( 'DB_NAME', 'wpdb' );
/** MySQL database username */
define( 'DB_USER', 'wpuser' );
/** MySQL database password */
define( 'DB_PASSWORD', 'dbpassword' );
/** MySQL hostname */
define( 'DB_HOST', 'localhost' );
-> 소유권 변경
chown -R www-data:www-data /var/www/html/wordpress
|
cs |
- 위와 같이하면 wordpress 확인 가능

- wordpress 유저 만들기
cf) 다시 초기상태로 돌아가고 싶으면 wpdb의 테이블을 모두 삭제

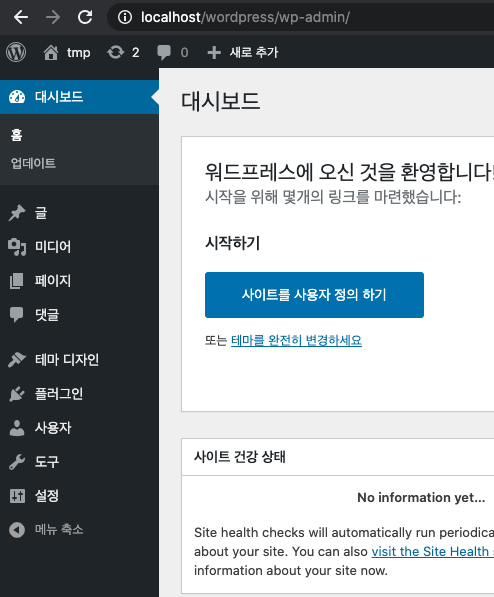
- 위의 유저를 phpMyAdmin에서 확인

cf) sites* 와 conf.d의 차이
What is the different usages for sites-available vs the conf.d directory for nginx
I have some experience using linux but none using nginx. I have been tasked with researching load-balancing options for an application server. I have used apt-get to install nginx and all seems...
serverfault.com
7. autoindex 설정
- 이게 맞는지는 모를 정도로 정말 쉬움...
/etc/nginx/conf.d/임의의.conf 이나
/etc/nginx/sites-available/default 같은 nginx설정 파일에서
server {
autoindex on;
}
해주면 됨
- 나는 /etc/nginx/sites-available/default에서 수정해줌
- (주의) autoindex on; 하는 경우 index.php 같이 /var/www/html(root)에서 찾을 수 없어야 함
-> root에서 index.nginx-debian.html을 찾을 수 있는 경우

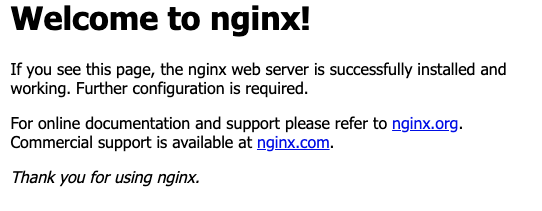
-> root에서 index 관련 찾을 수 없는 경우


- 환경 변수로 autoindex on 할지 말지 결정하려면 .sh 파일로 하는게 가장 좋을 듯
-> docker에 환경변수 세팅도 따져봐야 할 듯
8. SSL 설정 & redirection
- 참고한 글
Nginx + OpenSSL 구성
Ubuntu에 Nginx 설치 후 OpenSSL을 통해 인증서를 설치하여 SSL을 제공하는 웹 서버를 구성 사내 테스트를 위한 구축을 하며 정리한 내용이라 사설 인증서를 사용 Nginx 설치 sudo apt install nginx 인증서 생
youngmany.tistory.com
|
1
2
3
4
5
6
7
8
9
10
11
12
13
14
15
16
17
18
19
20
21
22
23
24
25
26
27
28
29
30
31
32
33
34
|
apt install -y openssl
mkdir /etc/nginx/ssl; cd /etc/nginx/ssl
openssl req -new -newkey rsa:2048 -nodes -keyout test.key -out test.csr
openssl x509 -req -days 365 -in test.csr -signkey test.key -out test.crt
vim /etc/nginx/sites-available/default 에서 진행
server {
listen 443;
root /var/www/html;
index index.html index.htm
server_name localhost;
ssl on;
ssl_certificate /etc/nginx/ssl/test.crt;
ssl_certificate_key /etc/nginx/ssl/test.key;
location / {
proxy_http_version 1.1;
proxy_set_header X-Forwarded-For $proxy_add_x_forwarded_for;
proxy_set_header Host $http_host;
proxy_set_header X-Forwarded-Protocol $scheme;
proxy_set_header X-Real_IP $remote_addr;
}
}
server {
listen 80;
server_name localhost;
return 301 https://$host$request_uri;
}
|
cs |
- 어차피 테스트를 위한 것이므로 사설 인증서 사용
- (주의) MacOS크롬에서는 "안전하지 않음으로 이동"이 없음
-> 그때는 한번 속는다 치고 페이지를 클릭하여 활성화 시킨 후에 thisisunsafe 하면 숨은키 발동함...;
-> 사파리에서는 잘 됨
- redirection 은 return 301 으로 해결
-> return 301 https://$host$request_uri가 이 부분임

- 정리된 conf파일
|
1
2
3
4
5
6
7
8
9
10
11
12
13
14
15
16
17
18
19
20
21
22
23
24
25
26
27
28
29
30
31
32
33
34
35
36
37
38
39
40
41
42
43
44
45
46
47
48
49
50
51
52
53
|
server {
listen 443;
root /var/www/html;
server_name localhost;
ssl on;
ssl_certificate /etc/nginx/ssl/test.crt;
ssl_certificate_key /etc/nginx/ssl/test.key;
location / {
autoindex on;
index index.php;
}
location ~ \.php$ {
include /etc/nginx/fastcgi_params;
fastcgi_pass 127.0.0.1:9000;
fastcgi_index index.php;
fastcgi_param SCRIPT_FILENAME /var/www/html$fastcgi_script_name;
}
}
server {
listen 80;
server_name localhost;
return 301 https://$host$request_uri;
}
|
cs |
9. 마무리
- dockerfile 명령어
|
1
2
3
4
5
6
7
8
9
10
11
12
13
14
15
16
17
18
19
20
21
22
23
24
25
|
FROM : 베이스 이미지 지정 (어떤 이미지도 베이스 이미지로 가능)
MAINTAINER : Dockerfile을 관리하는 사람 (그냥 email같은 형식인듯)
COPY <src> <dest> : 만들 이미지로 복사
ADD <src> <dest> : COPY와 유사, src에 URL가능, src에 압축파일이면 압축해제와 동시에 복사됨
RUN <command> : 명령어 그대로 실행 (빌드 시에만 함)
CMD <command> : 도커 컨테이너가 run되었을 때 실행되는 명령어, 빌드할 때는 실행하지 않음
WORKDIR <dir> : RUN, CMD, ADD, COPY 등이 이루어질 기본 디렉토리 설정
EXPOSE <ports> : listen포트 지정
VOLUME <data> : 컨테이너 외부에 파일시스템을 마운트 할 때 사용
ENV <key>=<value> : 컨테이너에 사용할 환경변수 지정 (빌드할 때 -e사용하면 기존값을 오버라이딩)
ENTRYPOINT <command> : run or start로 컨테이너를 시작할 때 실행됨 (dockerfile에서 단 한번만 실행)
cf) 간단한 CMD와 ENTRYPOINT의 차이
-> CMD는 만약에 run시에 다른 인자가 전달되면 CMD 생략 (docker run -it my_image /bin/bash 일때 CMD생략)
-> ENTRYPOINT는 어떠한 경우에든 Container가 run될 때 해당 값을 실행
|
cs |
- 작성한 Dockerfile 예시 (실제로는 많이 수정함)
|
1
2
3
4
5
6
7
8
9
10
11
12
13
14
15
16
17
18
19
|
# 1. debian:buster
FROM debian:buster
MAINTAINER heryu@student.42seoul.kr
RUN apt update
# install
RUN apt install -y nginx
RUN apt install -y php-fpm php-cli php-mysql
RUN apt install -y php-json php-mbstring
RUN apt install -y openssl
RUN apt install -y wget
RUN apt install -y mariadb-server mariadb-client
# copy src files
COPY ./srcs/* /tmp/srcs/
# run
EXPOSE 80 443
CMD sh /tmp/srcs/init.sh
|
cs |
- init.sh 파일
|
1
2
3
4
5
6
7
8
9
10
11
12
13
14
15
16
17
18
19
20
21
22
23
24
25
26
27
28
29
30
31
32
33
34
35
36
37
38
39
40
41
42
|
#!/bin/sh
cp /tmp/srcs/www.conf /etc/php/7.3/fpm/pool.d/www.conf
cp -pr /tmp/srcs/phpMyAdmin-4.9.0.1* /
tar -zxvf phpMyAdmin-4.9.0.1-all-languages.tar.gz
mv phpMyAdmin-4.9.0.1-all-languages /var/www/html/phpMyAdmin
cp /tmp/srcs/config.inc.php /var/www/html/phpMyAdmin/config.inc.php
AUTO=`echo $AUTOINDEX`
if [ $AUTOINDEX -eq 1 ]; then
cp /tmp/srcs/phpMyAdmin.conf /etc/nginx/conf.d/phpMyAdmin.conf
else
cp /tmp/srcs/phpMyAdmin_none_auto.conf /etc/nginx/conf.d/phpMyAdmin.conf
fi
mkdir /var/www/html/phpMyAdmin/tmp
chmod 777 /var/www/html/phpMyAdmin/tmp
chown -R www-data:www-data /var/www/html/phpMyAdmin
cd /var/www/html
cp -pr /tmp/srcs/latest.tar.gz /var/www/html/.
tar -xvzf latest.tar.gz
cd wordpress
cp /tmp/srcs/wp-config.php .
chown -R www-data:www-data /var/www/html/wordpress
mkdir /etc/nginx/ssl; cd /etc/nginx/ssl
cp /tmp/srcs/testkey* .
#openssl req -new -newkey rsa:2048 -nodes -keyout test.key -out test.csr
#openssl x509 -req -days 365 -in test.csr -signkey test.key -out test.crt
service mysql start
mysql < /var/www/html/phpMyAdmin/sql/create_tables.sql
mysql < /tmp/srcs/dbset.sql
service nginx start
service php7.3-fpm start
while :
do
sleep 1
done
|
cs |
10. 테스트하기
1. 파일 내부에 Dockerfile과 srcs가 전부
2. docker build -t ft_server .
-> docker images 로 확인
3. docker run -p80:80 -p443:443 ft_server
-> -e 옵션 : -e NOT_AUTOINDEX=1
4. Autoindex, 워드프레스, phpMyAdmin 확인
-> db연동 잘보기 (워드프레스db -> wpuser, dbpassword)
5. 리디렉션 확인
-> http://localhost:80
-> localhost:80
6. 인증키 확인
-> 죽였다가 start -> exec로 살리기
7. 환경 변수로 오토인덱스 끄기
-> docker run -p80:80 -p443:443 -e NOT_AUTOINDEX=1 ft_server
'42cursus' 카테고리의 다른 글
| Kubernetes(쿠버네티스) 개념 정리하기 (0) | 2021.01.07 |
|---|---|
| libasm - 참고 자료 위주로 정리하기 (42seoul) (1) | 2020.11.28 |
| cub3d - mlx사용법 위주로 정리하기 (42seoul) (2) | 2020.11.03 |
| ft_printf - 초간단 정리 (42seoul) (3) | 2020.10.11 |
| get_next_line - 초간단 정리 (42seoul) (0) | 2020.10.09 |

